• 104 West Main Street - Madelia, MN 56062
  • 507-642-5555
 bill pay icon  madelia telecommuter forward logo  smart rural community

1. Click Mail + Preferences from the menu.

1-preferences

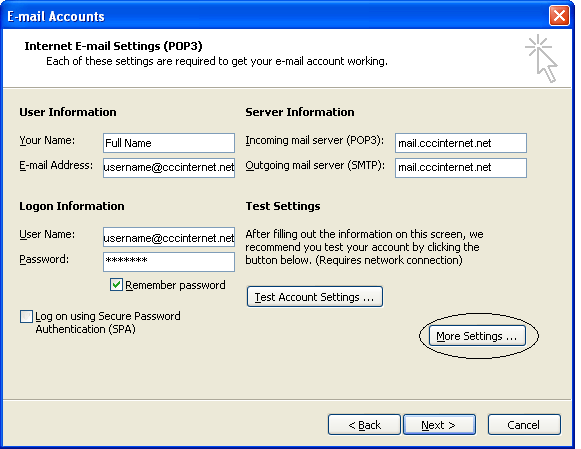
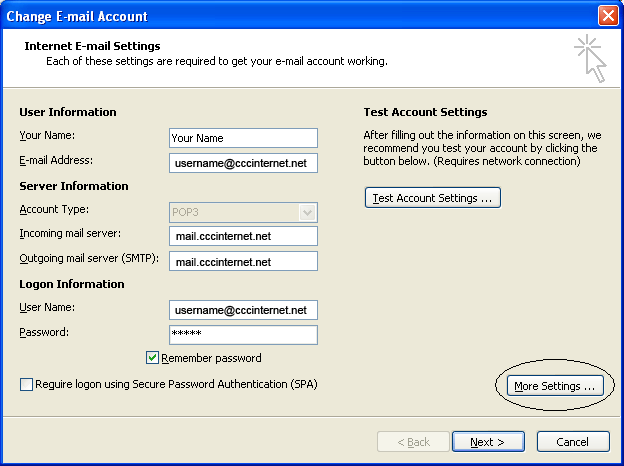
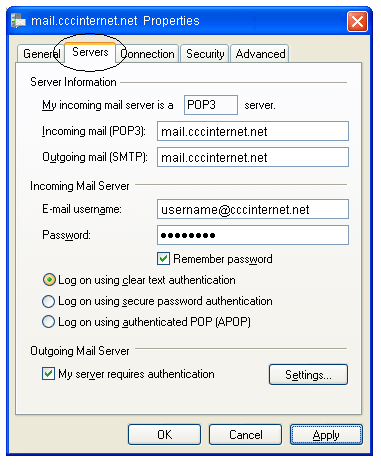
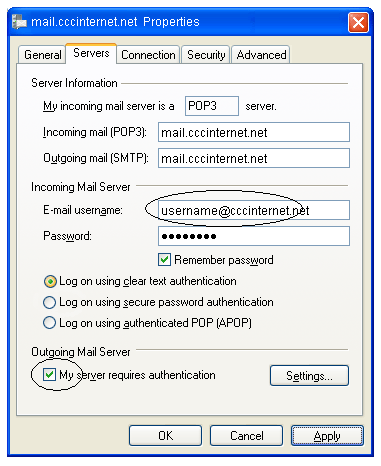
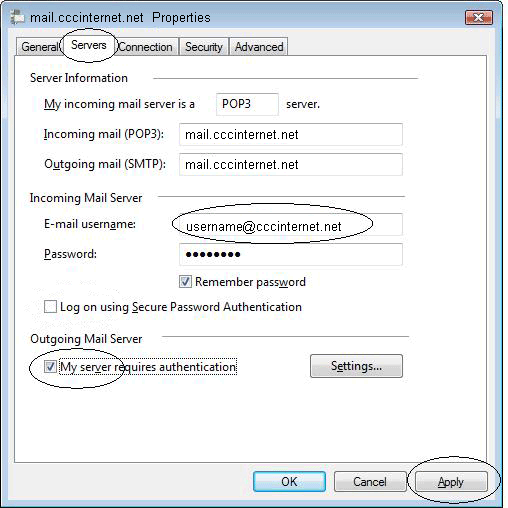
2. In the Accounts window, make sure 'Accounts' is selected along the top tool bar. Your e-mail accounts will be shown along the left. Select your 'cccinternet.net' mail account by clicking on it. As shown below, change your User Name to your complete e-mail-address. Then click on 'Server Settings'.

2A-accounts

3. In the Outgoing Mail Server window, make the following changes as shown in the screen shot below.

  • Server Port: Change to 465
  • Check the box for 'Use Secure Sockets Layer (SSL)'
  • Authentication: Select 'Password' from the drop-down field.
  • User Name: Enter your complete e-mail address.
  • Password: Enter your e-mail password provided to you by Christensen Communications. If you do not remember your password, please call Christensen Communications at 507-642-5555.


Click OK to save your changes and close the window.

4-outgoing

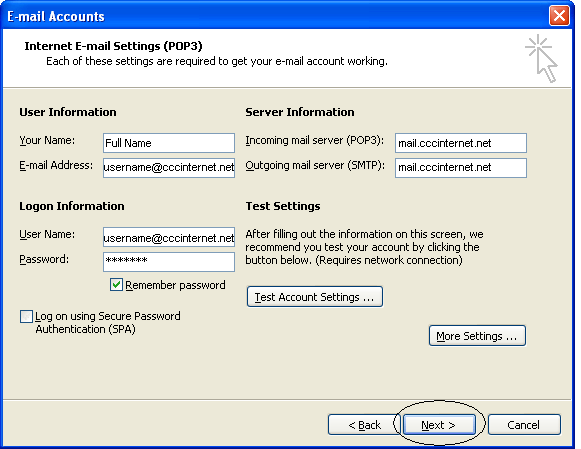
4. You should now be in the Accounts window once again. Click on 'Advanced'. Make the following changes as shown in the screenshot below:

  • Port: Change to 995
  • Use SSL: Place a check mark in the 'Use SSL' box.
  • Authentication: Select 'Password' from the drop-down menu.


5-Advanced

5.Close the Accounts window by clicking the red button in the upper left corner of the Accounts window. If asked to Save Changes, select SAVE. Changes are COMPLETED!

6-save


1. Click Tools + E-Mail Accounts from the menu.

1-tools

2. Select 'View or change existing e-mail accounts' and click NEXT.

2-view

3. Your 'cccinternet.net' e-mail account will be shown. Click on it to select it (it will turn blue). Then click the 'Change' button along the upper right.

3-mail-accounts

4. Under the Log on Information, change your user name to your complete e-mail address as shown in the example below. Check the box for 'Log on using Secure Password Authentication (SPA)' as shown below. Click 'More Settings'.

4-screen

5.Click the More Settings button.

5-screen

6. Click the 'Outgoing Server' tab. Check the box for 'My outgoing server (SMTP) requires authentication'. You'll notice it will automatically select 'Use same settings as my incoming mail server'. This should be selected as shown in the screenshot below.

6-outgoing

7. Click the 'Advanced' tab. Under the Advanced tab, make the following changes to the Server Port Numbers: (see screenshot below).

  • Incoming Mail (POP3): Change to 995
  • Check the box for 'This server requires a secure connection (SSL)'
  • Outgoing Mail (SMTP): Change to 465
  • Check the box for 'This server requires a secure connection (SSL)'


Click OK at the bottom of the window to save your changes and close.

7-advanced

8. Click NEXT at bottom of window.

8-next

9. Click FINISH. Changes are COMPLETED!

9-finish


1. Click Tools + Accounts from the menu.

1-tools

2. The Accounts window will appear. Click on the E-Mail tab across the top. Your 'ccinternet.net' e-mail account will be shown. You might need to click on your e-mail account shown to select it. Click the 'Change' button along the toolbar. A new window will open.

2-Change

3. The Change E-Mail Account window will appear. Under the Log on Information, change your user name to your complete e-mail address as show in the example below. Check the box for 'Require logon using Secure Password Authentication (SPA)'. Click 'More Settings'.

3-settings

4. In the Internet E-Mail Settings window, click the 'Outgoing Server' tab. Check the box for 'My outgoing server (SMTP) requires authentication'.

4-Outgoing

5. Click the 'Advanced' tab. Under the Advanced tab, make the following changes to the Server Port Numbers: (see screenshot below).

  • Incoming Mail (POP3): Change to 995
  • Check the box for 'This server requires a secure connection (SSL)'
  • Outgoing Mail (SMTP): Change to 465
  • Check the box for 'This server requires a secure connection (SSL)'


Click OK at the bottom of the window to save your changes and close.

5-Advanced

6. Click NEXT at bottom of window.

6-next

7. Click FINISH. Changes are COMPLETED!

7-finish


1. Click Tools + Accounts from the menu. (Note: If you don't have a menu bar, on your keyboard press ALT+M then press M again to turn on your menu bar.)

1-tools

2. The Accounts window will appear. Click on your mail account (see screenshot below). Click the Properties button along the right.

2-accounts

3. The Properties window will appear with five tabs across the top. Click on the Servers tab.

3-server

4. In the Servers window, you will need to make the following changes:  

  • In the Account Name field, enter your complete e-mail address (see screenshot below). Make sure it is all lowercase letters with no spaces within the e-mail address.
  • Check the box for 'My server requires authentication' (see screenshot below).


4-serverchange

5. Click Apply at the bottom of the window. Then click on the Advanced tab across the top.

5-advanced

6. Make the following changes: (use the screenshot below)

  • Outgoing Mail (SMTP): Change to 465
  • Check the box for 'This server requires a secure connection (SSL)'
  • Incoming Mail (POP3): Change to 995
  • Check the box for 'This server requires a secure connection (SSL)'


6-ports

7. Click Apply and OK at the bottom of the window.

8. Click Close to close the Internet Accounts window. Changes are COMPLETED!


1. Click Tools + Accounts from the menu.

1-tools

2. The Accounts window will appear. Click on the mail account, then click the Properties button along the right.

2-accounts

3. The Properties window will appear with five tabs across the top. Click on the Servers tab. Make the following changes as shown in the screenshot below:

  • In the Account Name field, enter your complete e-mail-address. Make sure it's all lowercase letters with no spaces within the e-mail-address.
  • Check the box for 'Log on using Secure Password Authentication'.
  • Check the box for 'My server required authentication'.
  • Click Apply.


3-server

4. Click on the Advanced tab across the top. Make the following changes as shown in the screenshot below:

  • Outgoing Mail (SMTP): Change to 465.
  • Check the box for 'This server requires a secure connection (SSL)'
  • Incoming Mail (POP3): Changed to 995.
  • Check the box for 'This server requires a secure connection (SSL)'


4-advanced

5. Click Apply and OK at the bottom of the window.

5-close

6. Click Close to close the Internet Accounts window. Changes are COMPLETED!


Contact Us

Christensen Communications
104 West Main Street
Madelia, MN 56062
Email Us

Phone: 507-642-5555
Fax: 507-642-5500

Support: 507-642-5555

Find Us

Find A Number

unnamed